Animation brings digital characters and objects to life, making immersive experiences for game players. As an inevitable element of game development in Roblox Studio, learning how to animate using this Roblox game-making app can boost development for both app beginners and experienced developers.
This JollyMax guide will walk beginners through Roblox Studio’s animation-making process, teaching knowledge and skills to implement dynamic movements in Roblox games. As an official partner of Roblox, JollyMax offers global players easy, fast & safe top-up of the game for value-added items and services.
Core Components of Roblox Studio’s Animation System
Roblox Studio offers robust animation tools through Animation Editor for game developers to make custom animations for Roblox objects and characters. Before getting into animation creation process, it’s important to understand key components of Roblox Studio:
- Animation Editor: The primary tool for creating and editing Roblox animations
- Rig: The skeleton structure that defines how an object or a character moves
- Keyframes: Points in time where game developers define the position of rig elements
- Animation Events: Triggers that can be set at specific points in Roblox animations
These components work together to make fluid animations that respond to player actions or game events. After being more familiar with Roblox Studio’s animation features, game developers can make more complicated movements for objects and characters. For better gaming experience and advanced player features, top up Roblox easily, fastly & safely at JollyMax official website.
How to Animate in Roblox Studio Step by Step?
Making animations in Roblox Studio follows a systematic way that allows game developers to build complex movements from simple components. Here’s a step-by-step guide to get started with Roblox animation:
Step 1: Accessing the Animation Editor
To begin making animations in Roblox Studio:
- Open Roblox Studio and load a Roblox game or make a new one
- Insert a character model that game developers want to animate
- Select the character model in the Explorer panel
- Click the “Animation” tab in the top menu
- Select “Animation Editor” to open the animation workspace
Step 2: Making a New Animation
Once game developers have the Animation Editor open:
- Click “Create New” in the Animation Editor panel
- Name the new animation properly with reasonable meanings, e.g. Walk, Jump, Idle
- Select the rig type that matches the character model wanted
- Click “Create” to generate a new animation sequence
The timeline at the bottom of the screen represents animation duration. Game developers will use this to place keyframes at specific points in time. To unlock advanced player features and improve gaming experience beyond Roblox, top up more games or recharge more apps easy, fast & safely at www.JollyMax.com.
Making Basic Animations in Roblox Studio
Next is how to make some fundamental animations to use in Roblox games. These animations serve basically as building blocks for more complex movements.
Making a Walking Animation
A walking animation is essential for most character-based games. Here’s how to make one:
- Create a new animation named “Walk”
- Set the first keyframe at 0 seconds with a character in a neutral stance
- Move to 0.5 seconds on the timeline and create another keyframe
- Adjust the right leg forward and the left arm forward, while moving the left leg back and right arm back
- Move to 1 second on the timeline and create another keyframe
- Reverse the position: left leg forward, right arm forward, right leg back, and left arm back
- Set the animation to loop by enabling the “Loop” option in the Animation Editor
This makes a basic walking cycle. Game developers can refine it by adding more keyframes for smoother transitions or adjusting the timing to change the walking speed.
Making a Jumping Animation
Jumping is another common animation needed by characters in many games:
- Create a new animation named “Jump”
- Set the first keyframe at 0 seconds with a character in a neutral stance
- Move to 0.3 seconds and create a keyframe where the character is crouching (bend the knees)
- At 0.5 seconds, create a keyframe with the character fully extended upward (legs straight, arms raised)
- At 0.8 seconds, add a keyframe with the character beginning to descend (legs slightly bent)
- At 1 second, finish with a keyframe showing the character landing (knees bent, arms out for balance)
This makes a complete jump animation including preparation, ascent, and landing phases. To unlock advanced player features and improve gaming experience beyond Roblox, top up more games or recharge more apps easy, fast & safely at www.JollyMax.com.
Advanced Animation Techniques in Roblox Studio
Once game developers have mastered basic animations, it is recommended to explore more advanced techniques to make sophisticated movements for Roblox games.
Using Easing Styles
Easing styles determine how Roblox animation transitions between keyframes, adding more realism to movements:
- Linear: Constant speed throughout animating process
- Sine: Smooth start and end with consistent middle movement
- Quad: More pronounced acceleration and deceleration
- Cubic / Quart / Quint: Increasingly dramatic acceleration and deceleration
- Elastic: Adds a bouncy effect to the movement
- Bounce: Makes a bouncing effect at the end of the movement
To apply an easing style in Roblox Studio, select a keyframe, then choose the desired easing style from the properties panel. Experiment with different styles to find out what best fits your animation purpose for game development.
Importing & Using Animation Plugins
Roblox Studio’s plugin system offers additional tools for animation:
- Animation Suite: Enhances the built-in animation editor with additional features
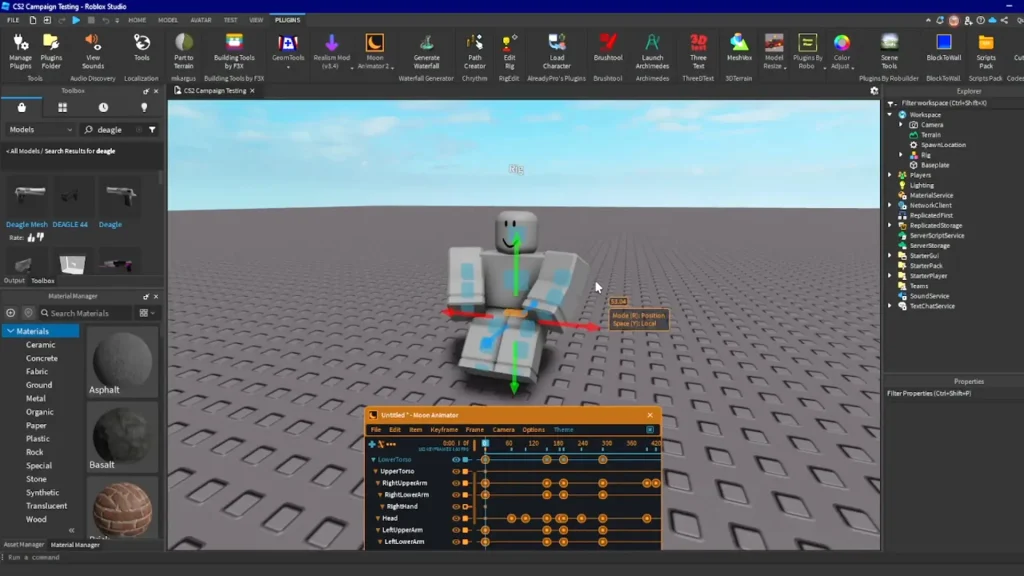
- Moon Animator: A popular third-party animation tool with advanced capabilities
- Animation Editor Plugin: Adds extra functionality to the standard animation editor
To install a plugin, navigate to the Plugins tab in Roblox Studio, click on “Manage Plugins,” and search for animation plugins in Roblox plugin marketplace.
How to Make Roblox Animations on Mobile Platforms?
Although Roblox Studio is primarily designed for desktop use, there are ways to make animations for Roblox games using mobile devices:
Using Remote Desktop Applications
One approach is to use remote desktop applications to access computer from mobile device:
- Install a remote desktop application on both computer and mobile device, e.g. TeamViewer, Chrome Remote Desktop
- Ensure Roblox Studio is installed and running on a computer
- Connect to the computer from mobile device using a remote desktop app
- Navigate and use Roblox Studio through a mobile device screen
This method allows game developers to access full functionality of Roblox Studio, though the smaller screen and touch controls may make precise animation more challenging.
Using Third-Party Animation Apps
Another approach is to use mobile animation apps to make animations that can later be imported into Roblox Studio:
- Create Roblox animations using mobile apps like FlipaClip or Animation Desk
- Export these animations as frame sequences
- Transfer the files to the computer for game development
- Use conversion tools to adapt the animations for Roblox Studio
- Import the converted animations into a Roblox game
While this method requires additional steps, it allows game developers to make more flexible animation on mobile devices.
Implementing Animations in Your Roblox Game
Once game developers have made animations, the next step is to implement them in Roblox game:
Saving & Publishing Animations
To make animations available in Roblox games:
- In the Animation Editor, click “Save” to save your animation
- Select “Publish to Roblox” to upload the animation to your Roblox account
- Set appropriate permissions for the animation (private, public, etc.)
- Note the animation ID that appears after publishing
The animation ID is crucial as it will be used in your scripts to reference the animation.
Scripting Animations
To implement animations in Roblox games using scripts, game developers need to work with the Animation and AnimationTrack objects:
Basic script example for playing an animation:
local character = script.Parent
local humanoid = character:WaitForChild("Humanoid")
local animation = Instance.new("Animation")
animation.AnimationId = "rbxassetid://YOUR_ANIMATION_ID"
local animTrack = humanoid:LoadAnimation(animation)

-- Play the animation
animTrack:Play()

-- Optional: adjust speed
animTrack:AdjustSpeed(1.5) -- 1.5x normal speed

-- Optional: stop after 5 seconds
wait(5)
animTrack:Stop()
Replace “YOUR_ANIMATION_ID” with the ID received when publishing Roblox animation.
Troubleshooting Common Roblox Animation Issues
Even experienced animators encounter issues when creating animations in Roblox Studio. Here are some common problems and their solutions:
Animation Not Playing
- Check the Animation ID: Verify that you’re using the correct animation ID in your script
- Confirm Humanoid Reference: Ensure the humanoid variable is correctly referencing the character’s Humanoid
- Animation Permissions: Make sure the animation is published with appropriate permissions
- Script Timing: Ensure the script runs after the character and humanoid are fully loaded
Jerky or Unnatural Movements
- Add More Keyframes: Increase the number of keyframes for smoother transitions
- Adjust Easing: Experiment with different easing styles to find the most natural movement
- Check for Extreme Poses: Avoid extreme joint rotations that might cause unnatural movements
- Preview at Different Speeds: Test the animation at various speeds to identify issues
Conclusion: Be Patient to Make Roblox Studio Animation
Animation in Roblox Studio is a powerful tool that can significantly enhance the quality and immersion of your games. By following the techniques and best practices outlined in this guide, you can create engaging animations that bring your Roblox games to life.
Remember that animation is both a technical skill and an art form. It requires practice and patience to master, but the results are well worth the effort. Start with simple animations, then gradually work your way up to more complex movements as your skills improve.
Whether you’re animating characters for a role-playing game, creating interactive objects, or designing cutscenes for your narrative, Roblox Studio’s animation tools provide the flexibility and power you need to realize your creative vision. Keep experimenting with different techniques, study animations in games you enjoy, and don’t be afraid to push the boundaries of what’s possible in Roblox game development.




Wuthering Waves Version 3.0 Release Date, New Characters & Featured Updates